




If your room takes longer to cool, the air smells stale, or the unit sounds louder than usual, the culprit is often a clogged filter rather than a broken AC. Learning how to clean air conditioner filter is one of the easiest jobs you can do yourself, and it takes about 15 minutes of actual work.
This guide covers split, window, wall and car units, with methods that work with or without a vacuum. Read it in order, or jump straight to the section that matches your AC.
Why Filters Clog Quickly
The filter is the first thing air passes through, so it catches dust, pollen, hair, smoke and cooking residue. In summer, when the AC runs for hours every day, a grey layer of felt-like dust can build up within a few weeks. Dusty roads, open windows, carpets and pets make it happen even faster.
Once airflow is restricted, the whole system has to work harder to do the same job. The three problems below are the ones homeowners notice first.
Hidden Health Effects
Trapped dust holds moisture and mold spores. A dirty, damp filter can push allergens and musty particles back into the room, which may trigger sneezing, itchy eyes or coughing. Children, older adults and people with asthma feel it most.
Higher Power Bills
When air cannot flow freely, the fan and compressor run longer to reach the temperature you set. Energy-efficiency agencies commonly estimate that a clogged filter can raise an air conditioner’s energy use by 5% to 15%, which adds up over a long summer.
Early Warning Signs
Watch for weak airflow, a room that takes longer to cool, a musty smell when the AC starts, a louder fan, or visible dust on the vents. If you notice any of these, check the filter before you call anyone.
Gather Supplies First
You do not need special products. Everything below is already in most homes, and having it ready makes the job quicker.
Household Items Checklist
- A soft brush (an old toothbrush works for corners)
- Mild dish soap
- A bucket or wide basin
- Lukewarm water
- A clean towel or microfiber cloth
- A handheld vacuum (optional)
- A stable stool or step ladder
The same items work for cleaning an air filter at home, whatever the AC type.
Safety Before Starting
Switch the AC off from the remote, then turn it off at the wall switch or unplug it. Stand on a stable stool and keep your hands dry. You will only wash the filter, never the unit itself, so keep water away from the electrical parts inside.
Know Your Filter Type
Washing the wrong filter is the fastest way to ruin it, so spend one minute identifying yours first.
Washable or Disposable
Check the manual or the label printed on the filter frame. Washable filters are usually plastic or nylon mesh with a firm, springy feel. Disposable ones are thin, papery or fibreglass, and often have a cardboard frame. If you cannot tell, treat it as disposable and replace it, because washing breaks its fibres.
Mesh, Foam, Carbon
Nylon mesh handles washing well. Foam filters can be washed too, but squeeze them gently instead of wringing them out. Carbon or deodorising filters are often wipe-only or replace-only, so look for a care note printed on the frame before putting them under water.

Aircon Filter Removal Guide
Removal is where most people hesitate. Here is how each AC type releases its filter, so the washing steps later can stay simple.
Split AC Front Grille
Hold the front panel at both sides and lift it upward until it stays open. The filters sit right behind it, usually as two slim sections. Pull the small tab or handle and slide each filter downward and out. Some models place the filter along the top, so look closely before pulling anything.
Window AC Slide-Out
Release the front grille by pulling its lower edge or pressing the side clips. A few models use two small screws. The filter is a flat rectangle sitting in rails just behind the grille. Slide it straight up or out while holding the unit steady with your other hand.
Wall Unit Panels
Through-the-wall and in-wall units hide the filter behind a front or side panel. Press the release tabs or unscrew the panel, and the filter slides out like a drawer. If you cannot see any tabs, look up the model number printed on the unit and check its manual.
Ducted Ceiling Grille
The return grille on a ceiling or wall has latches or clips. Release them, let the panel swing down, and slide the filter out. Note the airflow arrow on the frame, because it must face the same direction when you put the filter back.

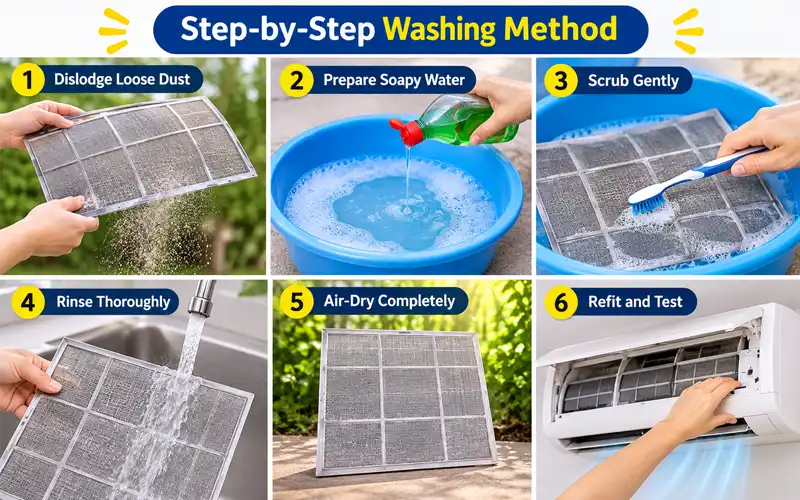
Step-by-Step Washing Method
This is the core method for any washable filter. It takes roughly 15 minutes, plus drying time.
Dislodge Loose Dust
Take the filter outdoors, or hold it over a bin, and tap the frame gently so the top layer of dust falls off. If it is sturdy nylon mesh, you can also pass a vacuum over it on low suction. Skip the vacuum on thin foam, which tears easily.
Prepare Soapy Water
Fill a basin with lukewarm water and add about a teaspoon of mild dish soap. Keep the water comfortably warm to the touch, because very hot water can warp plastic frames.
Scrub Gently
Let the filter soak for five minutes, then brush it lightly in the direction of the mesh. Use the toothbrush for corners and edges. Heavy grime needs patience rather than force, since hard scrubbing stretches the mesh.
Rinse Thoroughly
Rinse under a low-pressure tap or garden hose, angling the water slightly, until it runs clear and no foam remains. Leftover soap attracts fresh dust, so do not rush this part.
Air-Dry Completely
Shake off the excess water and stand the filter upright in the shade with air moving around it. Drying usually takes two to four hours, and longer in humid weather. Never refit a damp filter, because mold can start growing within a day or two and the smell will spread through the room.
Refit and Test
Slide the filter in until it sits flush, close the panel until it clicks, then switch the AC on. Hold your hand near the vent. Airflow should feel noticeably stronger within a few minutes.
Cleaning Without a Vacuum
A vacuum is helpful but never essential. These two methods cover most situations without one.
Soft Brush Method
For light dust, lay the dry filter flat and brush from the back side, the side that faces the AC, so the dust leaves the way it came in. A clean paintbrush works well. Finish by wiping the frame with a microfiber cloth.
Water-Only Rinse
If the filter is only mildly dusty, a gentle rinse under the tap is enough, and no soap is needed.
Surface Cleanup Without Removing
Sometimes you cannot take the filter out right away, for example when a clip is stuck or guests are about to arrive. Lift the panel and wipe the visible side with a dry microfiber cloth, or hold a soft vacuum nozzle just above the mesh.
This only lifts the top layer of dust. Dirt trapped deeper stays put, so treat it as a stopgap and do a proper wash at your next scheduled clean.
Vinegar Cleaning Guide
White vinegar is a popular choice for light grease and mild odours, and it costs very little. It works best on sturdy plastic mesh filters.
Ideal Mixing Ratio
Mix one part plain white vinegar with one part lukewarm water, for example two cups of each in a basin. Avoid flavoured or coloured vinegars, which can leave residue.
Soaking Time Limits
Soak the filter for 15 to 30 minutes. Longer soaking will not clean better and may soften frames or dull the mesh. Rinse well with clean water until the vinegar smell is gone.
Risky Situations
Skip vinegar on carbon-coated filters, glued foam layers, or any filter labelled water only. Black mold spots will not come out with vinegar, so replace that filter instead. Never mix vinegar with bleach, because the combination releases harmful fumes.

Car AC Filter Care
In a car, the part that cleans the air coming through your vents is the cabin air filter. It is separate from the engine air filter under the bonnet.
Locating the Cabin Filter
In most cars it sits behind the glovebox. Empty the glovebox, squeeze its sides or release the stopper arm so it swings down, and you will see a slim rectangular cover. Some models place the filter under the bonnet near the base of the windshield or under the dashboard, so check your owner’s manual if you cannot find it.
Swap or Wash Choice
Most cabin filters are pleated paper and are designed to be replaced, typically once a year or every 10,000 to 15,000 km, depending on the manufacturer. Washing a paper filter ruins it. If yours is a washable foam or reusable type, rinse it and let it dry fully before refitting. Between replacements, tap it gently and use a soft vacuum nozzle to remove loose debris.

Common Mistakes to Avoid
Most filter damage comes from a handful of avoidable habits.
- Using a pressure washer or strong jet: it tears the mesh and widens the gaps.
- Reaching for bleach or harsh chemicals: they weaken the fibres and can leave fumes behind.
- Scrubbing a dry, caked filter: wet it first so the dirt loosens instead of grinding into the mesh.
- Refitting it loosely: unfiltered air slips past the edges.
Dust and Humidity Tips
In hot, dusty regions, a dust storm or nearby construction can clog a filter in just a few days. Clean it the day after, whatever the calendar says, and keep windows shut while the AC is running.
During monsoon or other humid weather, mold takes hold faster. Smell the filter before you refit it: a musty odour means it needs a fresh rinse.
Frequency Guide for Homes
How often you clean depends on where you live and how hard the AC works.
| Situation | Suggested cleaning interval |
| Standard household, regular use | Every 4 to 6 weeks |
| Homes with pets or smokers | Every 2 to 3 weeks |
| Dusty area or near a main road | Every 2 weeks |
| Peak summer, running most of the day | Every 2 to 3 weeks |
Easy Monthly Routine
Pick one date each month and set a phone reminder. A five-minute look is usually enough to decide whether the filter needs a wash.
Replacement Signals
Even washable filters wear out, usually after one to two years of regular use. Replace yours when the mesh is torn or thinning, the frame is warped or no longer sits flush, or stains remain after a careful wash.
A worn filter lets dust through and strains the unit, so a new one costs less than the repairs it prevents.
Calling a Technician
Book a professional if cooling stays weak after a clean filter, ice forms on the pipes, you smell something burning, or the breaker trips. These point to problems like low refrigerant, a dirty coil or an electrical fault, and no amount of filter cleaning will fix them.
Frequently asked questions
Can I Skip the Filter?
Only for a very short emergency. Without it, dust coats the evaporator coil, which lowers cooling power and can lead to costly repairs.
What If a Smell Stays?
A lingering smell after a clean, dry filter usually comes from the coil or the drain tray, not the filter. A technician can clean those parts properly.
Why Is Water Dripping Afterward?
A few drops in the first minutes usually mean the filter was still damp or sits crooked, so take it out and reseat it. If water keeps leaking, the drain line is probably blocked and needs a technician.
Are Spare Filters Worth It?
Yes, if your model uses a common size. A second filter lets you swap one in at once and wash the first without leaving the AC unprotected, and it covers you when one wears out.
Should I Wipe the Panel?
Yes. With the filter out, wipe the front panel and grille with a slightly damp cloth and dry them straight away.
Does Cleaning Affect Warranty?
Filter cleaning is routine owner maintenance, and most manuals recommend it, so it does not void a warranty. Just avoid opening sealed or electrical parts, and check your warranty booklet if you are unsure.
Which Way Does It Face?
Refit it exactly as it came out. Take a quick phone photo before removing it, and follow any printed arrow on the frame.
Final Thoughts
Now that you know how to clean air conditioner filter the right way, the payoff is simple: stronger airflow, fresher air and a lower power bill for about 15 minutes of effort. Identify your filter type, remove it carefully, wash it gently and refit it only when fully dry.
If cooling stays weak afterward, contact a qualified technician to inspect the unit.